Pages

Showing posts with label cake. Show all posts

16/09/2013

Chocolate and caramel cupcakes

200g plain flour
25g cocoa powder
1 tbsp. baking powder
110g caster sugar
2 eggs
100ml sunflower oil
225ml milk
110g dairy toffees

Icing
100g milk chocolate (I used dairy milk)
200g unsalted butter
225g icing sugar

Caramel drizzle
100g condensed milk
25g unsalted butter
25g soft brown sugar

1. preheat oven to 190c and line a muffin tray
2. sift flour, cocoa and baking powder, then stir in the sugar
3. whisk together the egss and oil in a separate bowl until frothy then whisk in the milk
4. stir in dry ingredients until blended
5. spoon into paper cases until half full add a toffee and cover with more mixture
6. bake for 20-25 minutes until cooked

For the icing
1. mix the unsalted butter and the icing sugar together to taste, if it still taste of butter add more icing sugar
2. melt the chocolate and add to the buttercream and mix until blended through

For the caramel
1. place all the ingredients into a pan and bring to a slow boil
2. turn down low and simmer for 3 minutes, stirring constantly to prevent burning.

When all this is done pipe the buttercream onto the cooled cakes and then drizzle over the caramel.


This picture doesn't do them justice but they were brilliant!!

Katie

Waistcoat Birthday Cake

I was asked to make my one of my bosses birthday cake at the restaurant I work at. I was told to use my imagination on what to do with his cake. It took me forever to decide on what to do for him when the idea was staring at me straight in the face! He wear waistcoats to work as he works in the front of the restaurant... so I made him a waistcoat cake!


This was quite and easy cake to do as it was very simple design. It went down very well with my boss and his family!!

Katie

04/07/2013

Awesome Face Cake

My brother asked for a birthday cake he's into the walking dead programme on TV and asked if I could make him a walking dead cake. I said yeah sure fairly easy design found and was ready to make it. He then (as he is a teenage boy) decided he didn't want a walking dead cake he wanted an awesome face cake. As the loving sister I am I changed my plans and made this very simple awesome face cake!!


Katie

28/05/2013

1st Birthday Cake

I was asked to make a 1st Birthday cake for a friends niece. I was told she like giraffes, so she wanted a giraffe cake. I was given a picture of a cake she wanted but I wasn't quite sure whether I could do it or not, so I trawled the Internet for ideas and found a two tiered cake with a giraffe on top. I made three layers of vanilla 10" for the bottom tier and three layers of chocolate 8" for the 2nd tier, I cut each layer in half so it created six layers. I then sandwiched each layer together to create each tier. I then covered in fondant and then decorated it. For the giraffe I used pound cake in a spherical cake tin, I then carved it into the body and the head and then covered them in butter cream and then placed fondant over them and stuck them together.


I was very pleased with this cake!!!

Katie

21/05/2013

Neapolitan Style Cake

I saw a recipe in a book that looked like a Neapolitan ice cream, of course I fell in love with it immediately as it was something different and had to make it!!! I change the ingredients to what I like to use, because it was so much easier and I had the stuff in the house. I just use my normal victoria sponge recipe and multiplied it by three because I did one vanilla layer, one chocolate, and one raspberry. I made three layers out of them in one tin, so vanilla in one cake tin, chocolate etc, from this I cut the layers in half so I had six layers, two of each. I then put butter cream between each layer and sandwiched them together, so it looked like a Neapolitan ice cream I did decorate because I was bored and people automatically thought I had made it for someone, I'll point out again I did not make it for anyone I made it for my own entertain because I had nothing better to do!!!! I say it was pretty easy to do and I'd definitely do it again!!!


I couldn't decide how I wanted to deocrate and I've always wanted to do a present cake so I tried and did a present cake because I have too much time on my hands obviously. I wasn't too pleased with the bow because after I'd done it and left it over night on the cake it cracked and fell apart!! But beforehand it looked pretty good. I thought it needed something else so mum said to pipe butter cream around the edge in rosettes:


I thought it needed something else just to brighten it up because it didn't really have a lot of colour to it (in my opinion!!), so I made some butterflies, made them look like they were flying and stuck them to the butter cream:


I was pretty impressed with how it turned out just for a 'I think I'm going to make a cake'.


I was very impressed at how it looked inside as well!! You definitely wouldn't want a very big slice because it was very tall and had a lot of layers!!!

Katie

Toblerone Cupcakes

I found a recipe for toberlone cupcakes and as me being me I wanted to make them (because I love toblerone). I was very proud with how they turned out, and of course they stayed in the house but didn't last very long either!!!!!


200g (7oz) plain flour
25g cocoa powder
1 tbsp baking powder
110g caster sugar
2 eggs
100ml sunflower oil
225ml milk
1 tsp vanilla extract
100g toblerone
Icing
125ml double cream
250g plain chocolate
1 tsp vanilla extract
2 tbsp unsalted butter
To decorate
Coloured sweets
Sparkling sugar
100g toblerone (small)

1. preheat oven to 180c. line a 12 hole muffin tin
2. sift the flour, cocoa powder and baking powder into a bowl. Stir in the sugar.
3. Whisk together the eggs and oil in a separate bowl until frothy, then slowly whisk in the milk and vanilla
4. Stir into the dry ingredients with the chopped toblerone until blended together.
5. Spoon into the paper case and bake for 20-25 minutes, until firm and risen.
6. For the topping, heat the cream in a pan and bring to a boil. Immediately remove from the heat and pour over the chocolate. Stir until the chocolate has melted, then stir in the vanilla extract.
7. Add the butter gradually and stir until blended. Allow to cool until the mixture is thick enough to pipe.
8. Spoon into a piping bag and pipe on top of the cakes.
9. Decorate with sweets and sparkling sugar and place a toblerone triangle on top. Leave to set.

Katie

05/05/2013

Chilli Chocolate Cupcakes

My Dad wanted me to make a chilli chocolate cake for him to try, he didn't want a cake he wanted a big cake so I made cupcakes instead.


Ingredients:
250g Margarine
300g Light Muscovado
100g Plain Flour
100g Self-Raising Flour
4 Eggs
300g Dark Chocolate
1-3 Red Chillies (depends on your preference)
OR
1-3 tbsp Chili Paste/ Oil
ICING:
200g Dark Chocolate
200ml Double Cream
Method
1. Heat an oven to 190°C
2. Line a muffin tin with cupcakes cases.
3. Using a whisk, add the margarine to a mixing bowl together with the sugar. Whisk till light and fluffy.
4. Beat in the eggs one at a time.
5. Melt the chocolate
6. Once cool, add the chocolate to the mixture and mix in.
7. Add the remaining flour to the mixture and stir till smooth.
8. If you are using fresh chilli/es finely chop them, and either add now or crush/blend them to a paste.
9. If using ready made chili paste or oil, add it to the mixture now, or the paste you mad yourself. Add slowly, checking it does not too badly overpower the mixture. Stir till smooth.
10. Split the batter into the muffin cases.
11. Bake for about 25 minutes or till fully cooked.
12. Take out the cake, and let it cool for 10 minutes, before taking out of the tin.
13. To make Chocolate cream, melt the chocolate as before, and mix together with the cream, and then cool until thickened. Ice the cupcakes.

They are easier to make as cupcakes rather than a big cake because it will take just over an hour to cook.

Katie

27/03/2013

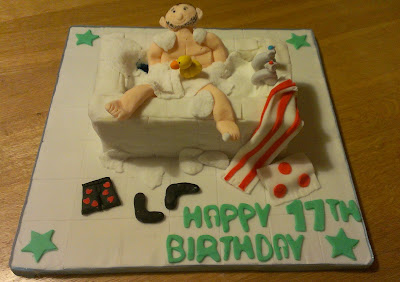
Dirty Birthday Cake

I was asked to make a birthday cake for a friends birthday party, we joked around saying that I should make her a dirty birthday cake and started looking at some cake ideas not thinking anything of it. We then actually decided that she wanted a dirty birthday cake and decided on a cake that we found in a book. And this is what it looked like:


This proved to be a very difficult cake to make (well for me anyway). I made a 10 inch square sponge cake, I cut it in half and then sliced the two pieces of cake in the middle to make four layers. I dirty iced three layers together and then with the fourth layer I cut about 1 inch in and cut the inside out to make a place for the guy to sit in, then I dirty iced all of it.

I then cut out squares to make tiles for the bath and stuck them on the cake. I found the body very difficult to do because I hadn't done a body before and I couldn't get the sizing right and he was too big to sit in the bath. Finally when I got the torso the right size, I put the torso in and then I did the legs and arms. Once they had been done I attached them to the cake and the torso. I then made the bubbles for the bath to cover him up; I rolled out some white fondant in a few pieces and then with a clean pan scourer and pressed it onto the fondant and made a bubble effect. Even though it is not very clear in the picture it was very effective. I then made the extras for the cake, duck, taps, pans, socks and towels. I then added the writing and stars because the cake board was a bit to big and it looked like it needed something else.

This was a very fun cake to make and definitely went down well at the birthday party!!

Katie

25/03/2013

My First Decorated Cake

When I first started decorating cakes, I found a cake that was perfect for my Grandpa and just had to make it. I wasn't quite sure how it would go and how difficult it would be, but I was fairly surprised at how easy it was. I was quite proud of my cake and my family was very impressed with it and it didn't last long when my cousins visited my grandparents house!!


I didn't have a lot of equipment to make it with, all I had was a few colour pastes, flower cutter, a ball tool and an edible black pen. So again I was very surprised at how easy it was.

I used a ten inch round cake and cut it out how I wanted it (I cut out a circular hole for the mole about 1 inch across and about 2cm deep). I then covered it with a thin layer of butter cream icing and then rolled out the green fondant and covered the cake; I got a few cracks in the bottom of the cake so I covered it with flowers to cover up these cracks. For the bushes I put a lump of green fondant in a sieve and pushed it through to create a leafy effect, which I thought looked rather effective.

For the golf club I used a black piece of fondant and molded a black handle and cut a few slits in it and used the ball tool to create circle dents in it. For the club I used a white piece of fondant and molded it into the shape of a club, this was rather difficult for a first timer but I got it right in the end. In the flat part of the club I cut a few slits in it to look like ridges. I then painted the club with food paste because it was easier than making the fondant that colour.


For the mole, I placed a small amount of grey fondant in the hole that would support the head higher than the cake. I then molded the head into a flatten cone shape and then added the arms which were black sausage shapes with slits cut into it that look like paws. I added the arms and then drew the face on the mole. I then made a ball of white fondant and used the ball tool to put holes in it and then I put it on top of the moles head. I then roles out a thin piece of white fondant and put it round the mole.
 

I was very happy with this cake and was very surprised at how it came out as it was my first decorate cake.


Katie